Every once in a while I listen to a Podcast about brewing. The most recent one I listened to was a Beersmith podcast from a few weeks back that talked about DMS in beer, which is normally regarded as a bad thing, but how some beers are purposely made to include it in their structure. For those that do not know, DMS – known as Dimethyl Sulfide – is caused usually during the boiling stage of beer where evaporate is inefficiently escaped and tends to find its way back into the boil kettle. Its very scientific how this process works, and for the purpose of this exact particular blog, I just want to talk about one of the beers that was mentioned as containing this said DMS:
Rolling Rock. From the glass lined tanks of Old Latrobe, as they say. DMS has always been explained to me as the cause of a Creamed Corn-like aroma – even this podcast mentioned as much.
Well, let me tell you a secret. When I got into beer so many years ago Rolling Rock was “my beer”. I don’t know why it became that, but it did. Some people chose Bud Light. Some Coors. Some New Castle. But of all the under $10 12-packs out there, Ro-Ro’s became my beer.
Fast forward many years, and I don’t think I’ve had one in at least 8 years. So I decided to do an experiment. I went to the store and I picked up a sixer of Rolling Rock and a can of creamed corn. I opened the creamed corn, gave it a whiff then let it sit for 10 or 15 seconds and gave it another whiff. Then I cracked a Ro-Ro and did the same thing.
I’ll say this first off. I think a better description would perhaps be that DMS might vaguely be similar to a creamed corn aroma but it is definitely by no means identical.
Secondly, I’ll say this: I really enjoyed drinking that 125 calorie-per-12-ounce beer-flavored carbonated water known as Rolling Rock just as much as I did nearly a decade ago. It was cool, crisp, watery and subtle.
Would I drink it every day? Hell no. But, the nostalgia factor certainly plays into my enjoyment of it. You never forget your first, they say.
I asked some of my friends what their guilty pleasure beer was. I got the usual range of answers. A couple Coors. A Pabst. Bud Light Lime. I cant say any of them particularly strike me as better than the other, personally.
With the rate that things are selling out to MillerCoors and InBev/Annheiser Busch, maybe everything is destined to become a watered down guilty pleasure beer. God…lets hope not.
Anywya, what is your guilty pleasure beer? Come on, I know we’ve all got one.
BrewDog decided to publish recipes for some 215 different beers they have brewed. They appear to be calibrated for all grain, 5 gallon batches which is also really cool, since they’ve taken t…
I was reading a WordPress blog a few weeks back and came across this term I’ve heard a few times but never really knew what it was: Smash-Brewing. I had thought it was some slang term for some type of Super MASH procedure. Maybe it was technique similar to BIAB(Brew in a bag) Mash, but with a different set of tools. No, after reading the blog I learned it actually stood for Single Malt and Single Hop. “Huh…Thats
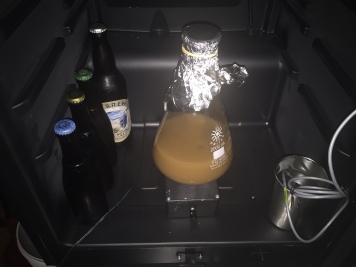
Yeast hanging out with some Westvleteren beers.
interesting.” I thought.
Just so happens that a few days later I spoke with my buddy Leigh of Mop Top Brewing about a collaboration we had been planning for a few weeks or months. I mentioned that I wanted to try a SMaSH brew. Not surprisingly, he had the same reaction I had weeks earlier, “What the hell is that?”. I explained it. He seemed on board, but we both admitted it could be a very boring beer. Granted, further research had informed me that part of the Smash brew was to learn the subtle nuances of a single hop and grain and how they interacted with each other. It is a learning experiment.
That is all fine and dandy, but we waned to do a little different. So, we went all wheat. Thats right, 100% wheat – not even rice hulls for the sparging. As far as hops go we chose one of my favorites and one that Leigh had not really messed with before: El Dorados.
Our grain bill included over 13 pounds of wheat. We milled these a little more coarse than normal just to aid in the sparge process. It didn’t seem to affect efficiency as we still ended up around 80%.
As for yeast…we decided to make that different as well. Wyeast #3463 Forbidden Fruit. Neither of us have ever used it but it is supposed to be a good yeast for experimental Belgian style ales. And, by our estimates, thats about what we made.
I don’t generally publish my grain bills, but here is this one
0.5 oz El Dorado 14.9 % AAu Flameout/Whirlpool
0.25 oz El Dorado 14.9 % AAu 5 mins
0.25 oz El Dorado 14.9 % AAu 10 mins
0.25 oz El Dorado 14.9 % AAu 20 mins
0.25 oz El Dorado 14.9 % AAu 26 mins
0.5 oz El Dorado 14.9 % AAu 60 mins
1.0 oz El Dorado 14.9 % AAuDry Hop 5 days
13.25LB White Wheat Malt
1.2 Liter Starter Wyeast Forbidden Fruit Yeast.
We did a protein rest at the high end of the scale at 127F for 30 minutes.
Our Mash was at 151 for 75 minutes.
We used a water profile similar to Orval.
Our Measured OG was 1.056
Est FG is 1.012.
We’ll ferment at 65F.
We will induce our Dry-Hop AFTER 5 days in the fermenter.
Heres to our bold crazy brew, codename: Ale Force One. I’ll update this as time goes on.
One of the toughest things in the world is naming beers. Ok, in the world might be a bit dramatic. But, it’s still tough. My brother asked us to brew up some beers for his wedding, so we brewed up a couple 7 gallon batches. One of the beers, a Kolsch(two-time award winning, I might add) was specially requested by his bride. The other was hand picked based on a couple questions I asked him(hop content? Body? Fruity? Dark or light?)
Yesterday, we decided to cook up what I think would be the third version of an as-yet-untasted Belgian Pale Ale. Our third batch, as it were.
First batch – Fermentation issue with suckback.
Second batch – Rushed, from kettle to keg, in 10 days to meet competition deadlines. Needless to say. Initial tasting were not impressive. Throwaway batch…
Third batch – TBD… Here we are.
I figured it would be fun if I went through the average brew day here at Benesh Brewing.
RISE AND SHINE
Yup, 8 in the morning.
8am. I’ve been trying to start brewing earlier in the day so I am done by 1pm. I used to start at 11am and since the rule is no beer until 12-noon I would be nice and buzzed as the brew process was happening, and focus would drift and I would finish by 8-ish. By starting earlier, I can stave off the drinks until around the boil process is almost over, and…it just works better this way.
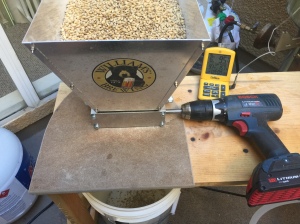
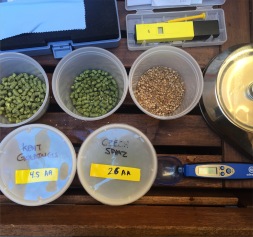
Where to start though? It’s 8am. I need crack my grains.
Grind those grains.
I already know I am brewing a Belgian Pale Ale. Its actually for my brothers upcoming wedding. Even though this is my 3rd iteration in as many weeks, I still originally brewed it with the idea of leaving it in the keg for a month before the wedding. That 1-month leisure period is now burned up and this is what Im looking at:
Brew: 1 day
Ferment: 3 weeks minimum, 4 weeks maximum
Keg & Carbonate: Two weeks
Bottle: 1 day.
This brewed March 15. That means this should be ready to drink sometime between April 21st-April 28th. The wedding is April 30th. Yikes! Lets get going.
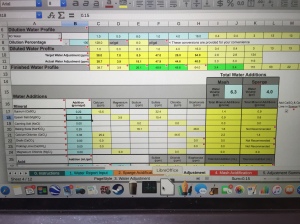
Bru’n Water Software for water calculations
I need to work out my water profile while the Mash water is heating up. I know that I want a water profile similar to what is available in Antwerp for our Belgian Pale Ale. We always start with RO water that is purchased from our resident water dealer. Its cheap in bulk and its nearly stripped of everything so I can build the profile myself. A little gypsum here, baking soda there. Calcium Chloride, Epsom salts, etc. The Bru’n water software will let you pick a water profile from a dropdown list, let you input what type of water you are using or the water profile of the water you might use, and then through a
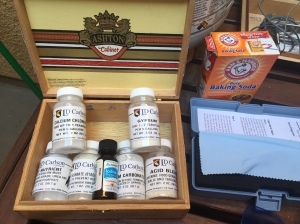
Minerals for addition.
series of manually input variables, you can best match your water by gallon with the profile selected. Its pretty neato!
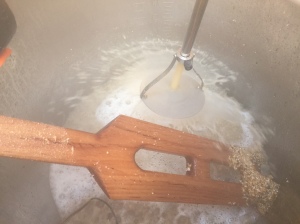
THE DOUGH-IN.
BEEP BEEP BEEP BEEP. Oh, thats just the mash water thermometer. Its hit my target temp for Mash-In. My grains are all crushed per my settings, and now I will mash-in, or dough-in while using my Mash Paddle. Making sure the grains don’t form an alliance to keep the water from penetrating their membrane, I’ll us the big mash paddle to break them up.
Dough-in
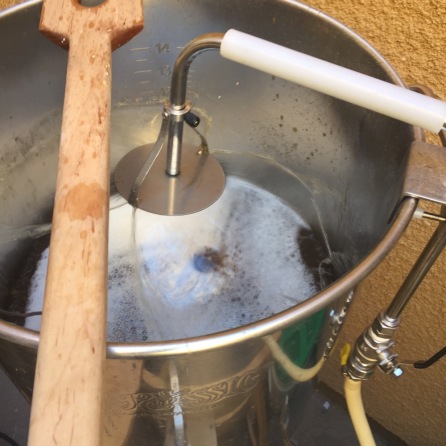
When all is said and done, I’ll adjust the temperature on the burner so that the mash stays a consistent temp that fits my mash schedule. Speaking of mash temp. There are a couple of different mash techniques you might be aware of. I use a circulation mash.this.
This is how the it works:
Mash Tun sits on a burner. The mash spigot, located at the bottom of the tun, is open and the mash is constantly recirculated via a pump through the sparge arm to the top of the tun. The theory is that the warmer wort(still becoming, anyway) located on the bottom of the tun near the burner will recycle up to the top of the mash, trickle through the grains and keep the temperature happy.
Recirculation Mash
Its a real necessity when using stainless mash tanks as they cool much much much quicker than the standard home-
brew insulated igloos. I’m not knocking those by any mean
s, but did I mention this added be
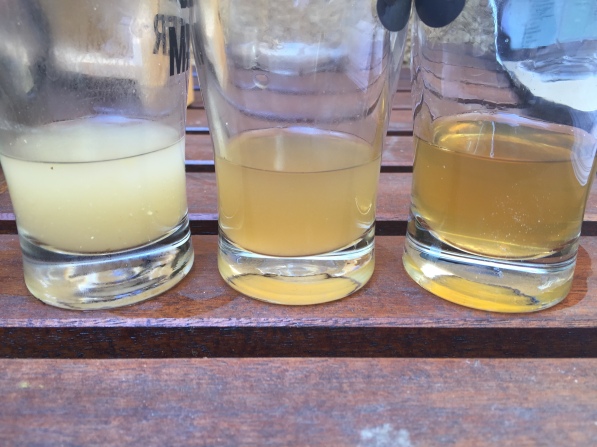
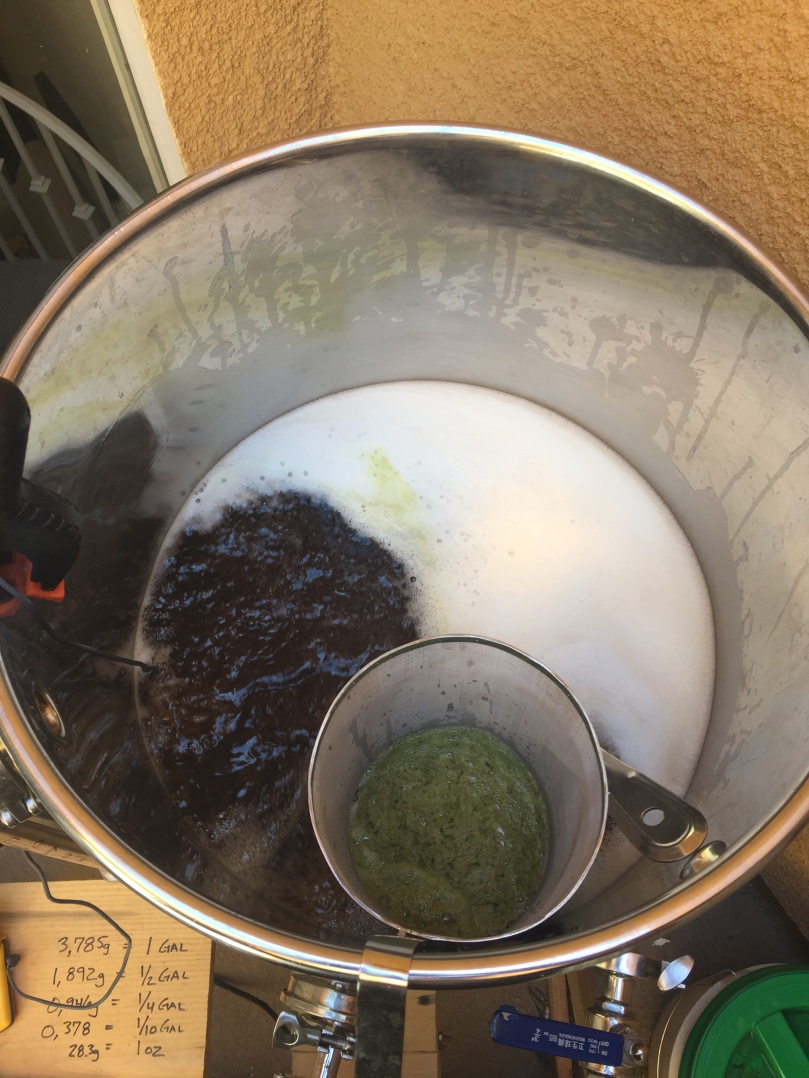
nefit of circ-mashing: Clarity. Your wort will be cleaner and clearer coming out of the tun into the kettle. As the recirculation is happening, many many tiny little particles of grain get filtered through the entire grain bed, eventually becoming trapped and filling in little gaps. As the individual little pathways of water are sorted out, the clarity improves dramatically. Check out this photo below, from left to right: Mash-in, 30 mins, and Mash-out.
Recirculation mashing: At Mash In, 30 minutes into mash, and just at mash-out.
Looks great, right? Sparge time:
Sparge. Looks nice and clear.
I brew 7 gallon batches with the intent of fermenting 6. This gives me an entire gallon to pull from for tastes, test gravity reads, etc. Look at all that wort to the right. Nice and clear, right? In my particular brewing situation, I boil off roughly about 1.4 gallons per hour of rigorous boiling.
THE BOIL
While the Mash-out is taking place(usually about 10 minutes – oh, did I not mention that in a recirc mash you don’t need to spend an hour mashing out? Just set that spigot to full speed, and fly-sparse like normal…except 4 times faster. Efficiency is already pretty taken care of with the recirculation mash. I average about 1/4-1/2 gallon more pull than BeerSmith calculates, and usually .002 or .003 gravity points higher as well.
Now that all the nice clean wort has been pulled, its time to get the kettle back up to a boil. Meanwhile, I am going to lay out all my additions for the boil. The hops, and in this case, some ground up coriander and just a little bit of home-made belgian-style beet sugar rock
Boil Additions. Hops and Herbs.
candi.
A few ounces of Goldings and my personal all-time favorite hop, Czech Saaz for finishing.
These additions go into a hop-spider I found online. Pretty sure its made for another brewing system, but it works wonders.
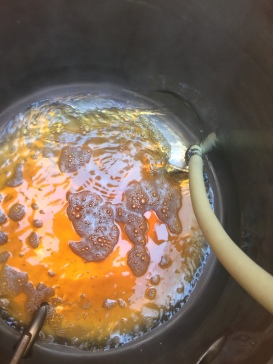
Here is an overhead of the boil:
Hop pellet goo in the hop spider.
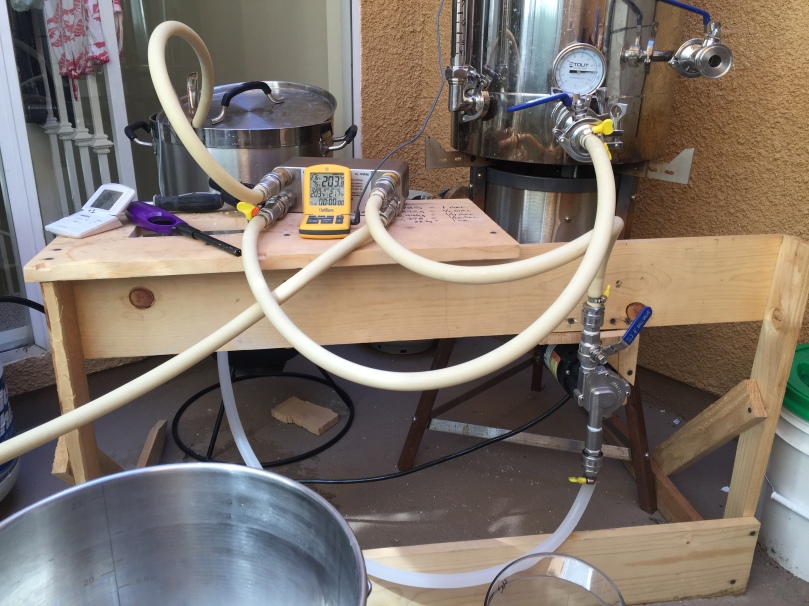
And, here is an overview of the tiny space I am crammed into:
Megapots, Stout Tanks, Thermoworks thermos, and a March Pump.
Lots of hoses. I’ll explain them to you – I’ve been hooking this up since the boil started, so all I would have to do at flame-out is open the spigot into my fermentations vessel:
Kettle has a hose into the plate chiller, which outlets into the fermentation tank. The smaller kettle on the left is filled with just-above-freezing water(ice and water). It outlets to the pump which outlets into the plate chiller and that outlets back into the chill-kettle.
FERMENTATION:
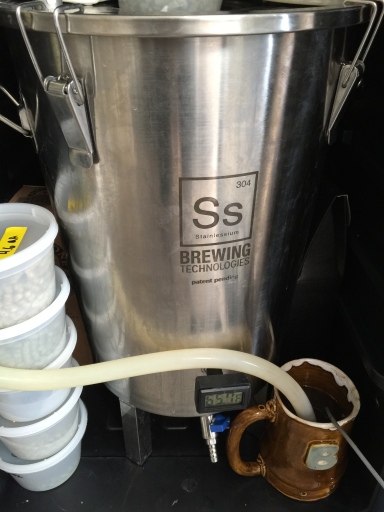
I made a mistake not taking a picture of the yeast-starter I’ve been working on. But, here is the gist: Belgian Ale Yeast, I made a 1.2Litre starter for this back. And I pitched it into this SS Brewbucket tank, which I highly recommend. I’ll tell you, the sooner you can let go of the translucence of the glass carboy you will be free. This is safer, lighter, easier to clean, easier to get your beer out of – with one exception, its pretty idiot proof: SUCKBACK.
When you go to free your beer of its dark, cold chamber, ALWAYS ALWAYS ALWAYS pull your blow-off tube out of the blow-off bucket, lest you suck all that crap
This tank is amazing.
back into the kettle(RIP, Belgian Pale Ale Batch 1). I’ve made 30 or so batches in this bucket, and I make that mistake nearly every time. You would think I would put a post it note or safety tape or something on the spigot so I remember before I evacuate its contents.
Hope this helps explain the brewing process. I’m glad to help in anyway I can if you have any questions.
And, for yeast. If you can get it at a home-brew store please do. While shipping it isn’t the worst thing, even more online retailers will admit it is not recommended. I’ve received yeast from an unnamed bigger home-brew company that was over 2 months old. At that point, yeast viability is probably hovering around 70%. Most home-brew stores will throw away yeast that is older than a month.
Would love to hear your questions or feedback. beneshbrewingco@gmail.com